I am so excited for you all to meet Jill this morning. She is visiting us from Creating My Way to Success. She was such a fun blog. She does a link up each Monday and then shares repurposing and sewing tutorials all week. I get so many great ideas from her. I love it! She is super sweet and always leaves such sweet comments to everyone who links up on Mondays. She is my bloggy friend from Australia and she has a fun re-purposing tutorial to share with us today.
Blog Meet Jill
Hello! I'm Jill from Creating my way to Success, in tropical Cairns, Australia!
I'm excited to be guest posting here for Danielle today on her lovely blog - Blissful and Domestic!
I got to know Danielle a bit more when she linked up some of her fantastic projects to my clothes upcycling linky page . She has so many fabulous ideas - she was an inspiration for me in my clothes upcycling challenge month!
You can see some of Danielle's projects and lots lots more here:

So after Danielle being an inspiration to me, I was thrilled when she asked me to guest post here for her!
I LOVE upcycling clothes - being able to prolong their life - and tailor them to personal tastes.
So I've prepared a small tutorial to show you here: I hope you like it!
------------------------------------------------------
My youngest daughter requested this refashion from a hand-me-down dress she didn't like.
I'm excited to be guest posting here for Danielle today on her lovely blog - Blissful and Domestic!
I got to know Danielle a bit more when she linked up some of her fantastic projects to my clothes upcycling linky page . She has so many fabulous ideas - she was an inspiration for me in my clothes upcycling challenge month!
You can see some of Danielle's projects and lots lots more here:
So after Danielle being an inspiration to me, I was thrilled when she asked me to guest post here for her!
I LOVE upcycling clothes - being able to prolong their life - and tailor them to personal tastes.
So I've prepared a small tutorial to show you here: I hope you like it!
------------------------------------------------------
My youngest daughter requested this refashion from a hand-me-down dress she didn't like.
She wanted it as a skirt- with a headband to match!

Here's the dress we started with:

I cut the top bodice, and the bubble base part off the dress:
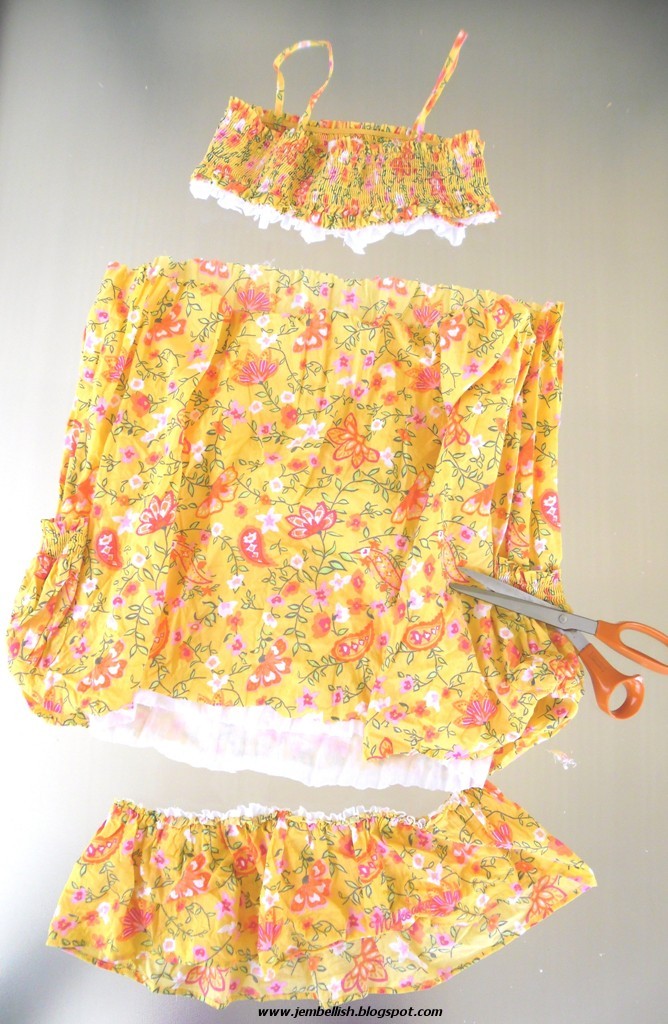
So I was left with just a wide band to which I needed to add new elastic to make the skirt:

I finished the bottom of the skirt off with a rolled hem using my overlocker (serger)

And neatened the top edge of the skirt to prevent fraying - also using my overlocker (serger)

Then I ran a row of stitching around the top of the skirt - on the longest stitch length and highest tension on my machine - to ruffle the fabric up and help me pin it to the elastic:

The waist elastic length I measured from another of my daughters skirts and stitched securely into a band:

To help pin the skirt evenly to the elastic, folded the band in half both ways to find 4 even points - where I put in pins.

Then did the same with the skirt - and matched up those 4 parts pinning the two together:

Then I stitched the top of the skirt to the elastic, using wide zig-zag stitch and stretching the elastic as I stitched:

Then I turned the elastic in on the skirt..

And top stitched it down again with a wide zig-zag stitch,stretching the elastic as I stitched:

And there we have a new skirt:

With a headband to match using the remaining fabric:

And of course the obligatory cool pose to show it all off!!


Hi, Danielle! Super cute and what a great, detailed tutorial! I love Jill, glad to see her cool project out and about.
ReplyDeleteSo very cute.. Awesome Jill!! Great tutorial!
ReplyDelete