Today we have Marilyn, from The Artsy Girl Connection. She is sharing a fun Halloween tutorial with you today. I am so excited for you to meet her. She has a fun blog with amazing photos. Make sure you check her out and send her some comment love.
Blog Meet Marilyn
-----------------------------------------
Hello everyone and thanks SO much for having me here today.It's truly a
pleasure to be sharing my awesome yet oh so simple tutorial of my fun
book page fall paper pumpkin! This is one of my favorite blogs
and I'm excited to catch a moment and be featured today!! Woohoo!
I'm Marilyn from next door ~>The ArtsyGirl Connection. I'm a simple mommy to
two beautiful lil Moon's, wife to be and DIY everything on dimes kinda gal! I love
photography, traveling, crafting and FOOD! My blog pretty much journey's my in's and
out's in trying to create my vision of a perfect space in a twisted but OH so
fun world of my own.. I live to laugh... Stop in and share in my fun...
Without further due....Lets carve up some pumpkins.
FALL PAPER PUMPKINS
My fall inspirational item is one of my favorites I've made in a while. It's
simple, budget friendly and a very creative fun craft to share with the family. I saw a
photo on pinterest awhile ago and decided it was a MUST have around the house
for this fall.. Kick back and lets create some word filled paper pumpkins..
Artsy Items Needed
An old tattered book (we seem to have more and more
now that Lil Sia has joined the family! She LOVES to
tear rather than read. Finding a book was EASY...)
Drift Wood
Scissors
Glue gun
Spray Paint
(Krylon- Pumpkin Orange)
Scrap paper
(to use as template for drawing)
Gold string optional
Lets Whip Up A Pumpkin
Draw out a pumpkin shape out of a piece of scrap paper.
I sketched out one & folded my paper in half after cutting out
the shape allowing it to become symmetrical.

Remove the outer cover of the book you choose to use and place on
the pumpkin cutout pattern with the fold along the binding edge.
(If it's not as fitting as you desire, simply trim it a bit)
Trace out your pattern with a pencil onto the book.

You should now be ready to cut out your pumpkin. Use an exacto knife
if you have one, a pair of scissors worked for me but it was a bit tough to
get through and I remembered my knife too late into it to back out. I got
through a good lump of pages at a time easily. (You can cut out batches
of pumpkin templates, so don't pull your hair out trying to cut out
ONE batch from the book in one seating. Take your time, cut out
batches and glue them all together afterwards.)

After carefully cutting all the way around, remove the excess
pages over to the binding, it should tear off fairly easily.
Trace out more and cut out as many pages as you can,
the more pages, the fuller your pumpkin.

Once all your pages are cut out, place a thin strip of glue on the
binding sides and glue them all together in a circular shape
(each binding side inwards). When you stand your
pumpkin up, it'll look similar to this at that point.

It's now time for FUN & FLUFF!! Go around your pumpkin and fluff out
all the pages. It might take sometime (I popped on a movie and fluffed
a can of orange Krylon spray paint. The cool thing I realized later was,
in a hurry to get OUT the store before I went shop craze, I didn't
even notice the paint was called "Pumpkin Orange".. How sweet!
Spray your pumpkin lightly all around in coats until you have the
perfect shading to your liking, I wanted a more orange look to mine
as I planned on sitting it on a piece of light wood in the kitchen.

After spray painting, allow to dry for a a few hours. I fluffed out the
pages some more as a few stuck together due to the paint. To add a final
look of fall to my pumpkin, I inserted a piece of driftwood from the yard
to the middle. I used some glue to insert the wood into the middle of
my pumpkin. This part is a bit tricky so take your time as to not rip
your pages as you try to insert the wood. VOILA!!

I wrapped a piece of gold string I found in my craft draw for a touch
of added color & jazz around the part of my wood that meets the pages.
(I've seen a lot more with ribbons, but I loved the simplicity of the
string much more, use a ribbon and decide which looks best for you)

ALL DONE!!! I made a few to share with my neighbors with a cute note
 Pin It
Thanks so much for featuring me today. It's truly been an honor
& I sincerely appreciate it.. Please stop by sometime and visit me
via myblog~ The ArtsyGirl Connection ~Stay Artsy~
photo on pinterest awhile ago and decided it was a MUST have around the house
for this fall.. Kick back and lets create some word filled paper pumpkins..
Artsy Items Needed
An old tattered book (we seem to have more and more
now that Lil Sia has joined the family! She LOVES to
tear rather than read. Finding a book was EASY...)
Drift Wood
Scissors
Glue gun
Spray Paint
(Krylon- Pumpkin Orange)
Scrap paper
(to use as template for drawing)
Gold string optional
Lets Whip Up A Pumpkin
Draw out a pumpkin shape out of a piece of scrap paper.
I sketched out one & folded my paper in half after cutting out
the shape allowing it to become symmetrical.
Remove the outer cover of the book you choose to use and place on
the pumpkin cutout pattern with the fold along the binding edge.
(If it's not as fitting as you desire, simply trim it a bit)
Trace out your pattern with a pencil onto the book.
You should now be ready to cut out your pumpkin. Use an exacto knife
if you have one, a pair of scissors worked for me but it was a bit tough to
get through and I remembered my knife too late into it to back out. I got
through a good lump of pages at a time easily. (You can cut out batches
of pumpkin templates, so don't pull your hair out trying to cut out
ONE batch from the book in one seating. Take your time, cut out
batches and glue them all together afterwards.)
After carefully cutting all the way around, remove the excess
pages over to the binding, it should tear off fairly easily.
Trace out more and cut out as many pages as you can,
the more pages, the fuller your pumpkin.
Once all your pages are cut out, place a thin strip of glue on the
binding sides and glue them all together in a circular shape
(each binding side inwards). When you stand your
pumpkin up, it'll look similar to this at that point.
It's now time for FUN & FLUFF!! Go around your pumpkin and fluff out
all the pages. It might take sometime (I popped on a movie and fluffed
away..) & fluffed...& fluffed...Oh yea & fluffed some more!! Whew!
After all that fluffing, your pumpkin should look like this!!
(If you have spaces, fluff more or cut out some
more from your book for fillers)

Now it's time for COLOR!!! I went to home depot and picked up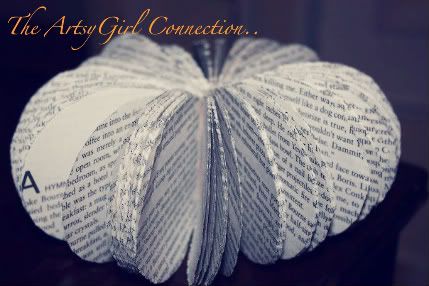
a can of orange Krylon spray paint. The cool thing I realized later was,
in a hurry to get OUT the store before I went shop craze, I didn't
even notice the paint was called "Pumpkin Orange".. How sweet!
Spray your pumpkin lightly all around in coats until you have the
perfect shading to your liking, I wanted a more orange look to mine
as I planned on sitting it on a piece of light wood in the kitchen.

pages some more as a few stuck together due to the paint. To add a final
look of fall to my pumpkin, I inserted a piece of driftwood from the yard
to the middle. I used some glue to insert the wood into the middle of
my pumpkin. This part is a bit tricky so take your time as to not rip
your pages as you try to insert the wood. VOILA!!

I wrapped a piece of gold string I found in my craft draw for a touch
of added color & jazz around the part of my wood that meets the pages.
(I've seen a lot more with ribbons, but I loved the simplicity of the
string much more, use a ribbon and decide which looks best for you)
ALL DONE!!! I made a few to share with my neighbors with a cute note
attached saying "Ushering in the fall" .. They thought it was absolutely
darling.. What do you think..? I love how easy this tutorial is and how
fantastic it will be to involve your little helpers. They'll love it!!
fantastic it will be to involve your little helpers. They'll love it!!

Thanks so much for featuring me today. It's truly been an honor
& I sincerely appreciate it.. Please stop by sometime and visit me
via myblog~ The ArtsyGirl Connection ~Stay Artsy~


THis is awesome.. THANK YOU SO VERY MUCH for having me.. I'm totally excited and loving to be here.. Hope your friends enjoy my tutorial here today.. TY TY again.. : )) Have a great start to your week..
ReplyDelete